DIY PROJECTS/TUTORIALS
Did you know?
The Colour Vie pigments are pure. As well as producing great colour on fabric, they can be used to stain wood! These beautiful wood stain samples were created by Loree Ovens. For Loree's complete instructions on how to stain wood, just e-mail us: colorvie at istar.ca
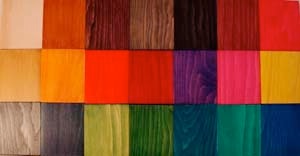


Click image at right
for full view of fabric

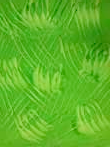
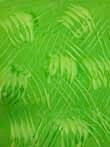
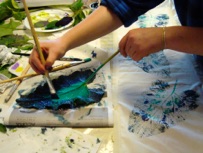
LEAF PRINTING ON FABRIC by Gunnel Hag
What can be more fun than bringing your garden plants or any or other plants inside to be enjoyed all year round? Here are some easy and inspirational techniques for using real leaves, grass or even flowers to do just that while printing fabrics that can be used in quilts or for any other project you have in mind.
To prepare your work area:
A slightly soft print surface works best for this kind of fabric printing. Simply placing a couple of layers of newspaper, a blanket, thin foam rubber or thick fabric under the fabric that you are going to print on does the trick.
You will need:
- a selection of fresh leaves in different shapes and sizes. (Make sure they have good veins on the back and are not brittle. Maple leaves are great to start with).
- white or pale coloured fabric
-
-fabric pigments
- sponge brushes and/or paint brushes
- paper towels
- newspapers
- optional: a brayer
1. Paint the back side of the leaf (the side where the veins are). Don’t forget to paint the stem too. Practice on a few scraps of test fabric first, so you get used to applying the right amount of pigment to the leaf. Too much will give you a smudgy print. Too little a very faint print.
2. Flip the leaf over and carefully place it paint side down on top of your fabric. Cover with a paper towel and use your hand to press down gently but firmly without moving the leaf. An option is to use a brayer or rolling pin Experiment!
3. Remove the paper towel and carefully lift up the leaf by the stem.
4. Heat set the finished prints when they are completely dry by ironing slowly and deliberately on the unprinted side of the fabric for approx. 30 second per square foot with the iron a a cotton setting. Do not use steam.
A few design tips:
- Place leaves randomly on the fabric with overlapping colours.
- Place leaves in a row for a border print.
- Start with transparent colours. Then overprint with opaque or metallic pigments.
- Paint the leaf with more than one colour.
- Use metallic pigments on dark fabrics for dramatic contrast .
Preserving leaves by freezing
You will need:
- Fresh leaves
- Glycerin (available from the drug store)
- Shallow pan
- 2 towels
- Paper towels
- Plastic zip lock bag, large
1. Mix a solution of 1 part glycerin to 3 parts water in the pan.
2. Place the leaves in the pan one at a time so each side has contact with the solution as it goes in. You can soak several layers of leaves at once.
3. Leave the leaves in the glycerin solution for several hours or overnight.
4. Place leaves in one layer on an old towel. Pat dry with another towel.
5. Let the leaves air dry for a few hours.
6. When the leaves feel dry (they will feel supple, but not wet), place them in the zip lock bag. Layer with a couple of paper towels. This will absorb any moisture that may remain.
7. Place the zip lock bag in the freezer.
When you are ready to print again:
Remove the zip lock bag from the freezer. If any ice crystals have formed, pat the leaves dry with paper towels.
Print as you would with fresh leaves.


SILK SCREEN PRINTING TUTORIAL AT CANADIAN QUILTING CQA/ACC
For an easy screen print tutorial please visit: http://cqacanadianquilting.blogspot.ca/2013/04/gunnel-hag-with-screen-printing-tutorial.html?utm_source=feedburner&utm_medium=email&utm_campaign=Feed:+CanadianQuiltingCqa/acc+(Canadian+Quilting++CQA/ACC)
